

Chapter 05
Headers
Before diving into the response part of the original cURL request, let's talk a bit about headers in a HTTP Request and Response.
HTTP headers are important for communication between clients, usually browsers, and servers on the web. Headers are a way to provide more info than just the basic request or response.
One example of an HTTP header is the Authorization header, which is used to provide authentication information for a request. The header name is "Authorization" and the header value typically includes the authentication scheme and credentials.
For example, a basic authorization header might look like this: "Authorization: Basic dXNlcjpwYXNzd29yZA==". In this case, the authentication scheme is "Basic" and the credentials are the base64-encoded string "user:password".
The way this header would appear in an HTTP request would be something like this:
Authorization: Basic dXNlcjpwYXNzd29yZA==
Let's look at the syntax a bit more closely.
Header Name
The header name is case-insensitive, meaning that it doesn't matter whether you use uppercase, lowercase, or a mix of both when specifying the header name. This allows for more flexibility when working with HTTP headers. In our example, the header name is Authorization.
Note
Note: HTTP/2 enforces lower case header names, or it treats the header names with mixed casing or upper casing as malformed.
Colon (:)
The colon (:) separates the header name from its corresponding value. This helps to distinguish the name of the header from its value and makes it easier to read and understand. Without the colon, the header name and value would run together and be difficult to identify.
Think of headers somewhat similar to a JSON key-value pair, except the double quotes. For example "key": "value".
Header Value
The value of the header follows the colon. This value provides specific information relevant to the context of the request or response. For instance, the "Content-Type" header might have a value like "application/json" to indicate that the content being sent is in JSON format.
Other examples of header values include timestamps, authentication tokens, and content length. We'll take a look at common header values in a bit.
Whitespace
Leading whitespace (spaces or tabs) before a header value is ignored to improve readability of transmitted data and ensure proper parsing by the recipient. However, trailing whitespace after the header value is not ignored and may cause issues if not removed.
Custom X- based headers
Developers and organizations used to add extra information to HTTP requests and responses using custom headers. These headers would start with "X-" to show that they were not part of the official HTTP standard.
For example, a website might use a custom header like "X-Session-ID" to send extra information about the user's session. But using custom headers had some problems.
First, some custom headers became so popular that they were added to the official HTTP standard, causing confusion.
Second, different developers used custom headers in different ways, making it hard to understand them.
In 2012, custom headers starting with "X-" were officially discouraged. Instead, developers were encouraged to use an official registry of HTTP headers managed by the Internet Assigned Numbers Authority (IANA).
This registry lists all the official HTTP headers, including ones that used to be custom. The IANA also has a registry for new headers that developers suggest. This helps ensure that new headers are considered carefully before becoming standard.
Note
In short, custom headers starting with "X-" are no longer recommended.
Request headers
Request headers are sent from the client to the server and contain additional information about the client's intent and the resources it wants to access. In the cURL output that we previously saw, we had a Request header:
Accept: */*
Request headers provide the server with guidance on how to handle the request and tailor the response accordingly. By including request headers, the client can inform the server about the preferred language and encoding, any authentication credentials, and more.
This additional information helps the server to better understand the client's needs and respond appropriately.
The request headers can also provide valuable context to intermediaries such as proxies and gateways, helping them to correctly route and handle the request as it travels through the network.
Therefore, it is essential to include accurate and relevant request headers to ensure successful communication between the client and server.
Let's take a look at some of the common request headers:
Accept
We previously talked about the Accept header in the "Mime Type and Content Type" chapter. To re-iterate, it is used by the client to communicate the media types or content types that it can understand and handle.
This header allows the server to select an appropriate format for the response, taking into account the client's preferences. Without the "Accept" header, the server may send a response in a format that the client cannot interpret, resulting in a communication breakdown.
Additionally, the "Accept" header can include multiple media types, allowing the server to select the best format from the list of media types that the client can handle. This flexibility provides more options for the server to deliver the response, enhancing the user experience.
An example of Accept headers that include multiple media types is given below:
Accept: text/html,application/xhtml+xml,application/xml;q=0.9,image/webp,image/apng,*/*;q=0.8
It supports a lot of media types (or "content-type"s). One thing to note is the q=0.9 and q=0.8 parameter. It is called relative quality factor or in short quality factor. This says, the higher the value of q is the more the preference of that content-type is.
Let's break down the entire header value step-by-step
text/html- This media type represents HTML content, which is used to structure and present web content.
- There is no specified q-value, so it's assumed to be 1 (highest preference).
application/xhtml+xml- This media type represents XHTML content, which is an XML-based version of HTML.
- There is no specified q-value, so it's assumed to be 1 (highest preference).
application/xml;q=0.9- This media type represents XML content, which is used for data interchange and structured documents.
- The q-value is 0.9, indicating a slightly lower preference compared to HTML and XHTML.
image/webp- This media type represents WebP images, a modern image format that offers efficient compression.
- There is no specified q-value, so it's assumed to be 1 (highest preference).
image/apng- This media type represents Animated Portable Network Graphics (APNG) images.
- There is no specified q-value, so it's assumed to be 1 (highest preference).
*/*;q=0.8*/*is a wildcard media type that matches any type of content.- The q-value is 0.8, indicating a preference that is lower compared to specific formats.
Referer
The "Referer" specifies the URL of the page that led the client to the current page. This header is often used to understand the client's navigation context and referral sources.
By analyzing this information, websites can gain valuable insights into how users interact with their site and where they come from.
This header can be used to track user behavior and provide personalized recommendations or targeted advertising. It is important to note, however, that some browsers and privacy plugins may block or modify the Referer header, which can affect the accuracy of the data collected.
A very simple example is the github analytics. Open any of your open-source (public) repository and visit the following link:
https://github.com/ishtms/learn-nodejs-hard-way/graphs/traffic
Replace ishtms with your github username, and learn-nodejs-hard-way with your repository slug. On the bottom of this page, you'll see this section:
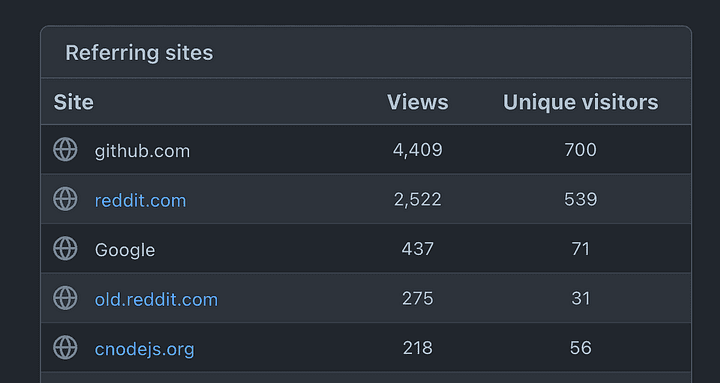
So, github is actually tracking the visitors based on the Referer request header! Isn't it cool to know where the users on your repository came from?
Here's an example of how the Referer header may look like:
Referer: https://www.reddit.com/r/sub-reditname/post-id
Authorization
The Authorization header is a vital component of secure communication between clients and servers. It carries authentication information, such as tokens or credentials, which are used to verify the identity of the user and grant access to protected resources.
Without this header, access to restricted content would be impossible, leaving sensitive data vulnerable to unauthorized access. Therefore, it is essential to ensure that the Authorization header is implemented correctly and that it is encrypted to protect against potential security threats.
Note
There are other ways to send the token/credentials, like the response body, but that is not considered standard. Prefer the Authorization header to send Authorization/Authentication specific data.
An example of how the Authorization header may look like is given below:
Authorization: Bearer eyJhcGciOiJIUzT1NiIsInR5cCI6IkpXVCJ9
## or
Authorization: Basic DWxcZGRpbjpPcGVuU2VzYW1l
Cookie
Note
This is a type of header which is both - sent by a client to the server, and from server to the client. We'll see one more, i.e the Content-Type header.
When a user requests a website, the server sends back a response with a "Cookie" header that contains previously stored cookies. These cookies are then sent back to the server with future requests, allowing the server to maintain state and session information across requests.
This information can include user preferences, login status, and other data that can be used to personalize the user's experience on the website.
Without cookies, the server wouldn't be able to recognize the user from one request to another, and the user would have to log in again with every new request. Therefore, cookies play a crucial role in enabling a seamless and personalized browsing experience for users.
An example of how you could send the Cookie header in a request is given below:
Cookie: session_id=b1dxc5QrdR; prefers_notif=no
session_id=b1dxc5QrdR
This cookie holds a session id. Sessions are a way to maintain user-specific data across different requests. The
session_idvalue ofb1dxc5QrdRis a unique identifier associated with a user's session on the server.It allows the server to link requests to a particular user.
;
Multiple session keys are separated using a semi colon (
;).prefers_notif=no
- This cookie also holds the user's notification preference, which tells whether to show this user a browser notification or not. This is just a dummy example, and is not how you'd manage notification preferences.
Host
Note
We talked about the Host header in the chapter 5.1.
The "Host" header specifies the domain name of the server being addressed. This is particularly important in the cases where one physical server hosts multiple domains.
Without the "Host" header, the server would not know which domain the client is requesting, and would be unable to serve the appropriate content.
By including the "Host" header in the request, the client can ensure that it receives the correct response from the server. This simple yet essential piece of information helps to ensure the smooth functioning of the internet and the web as we know it.
Here's an example of the Host header in a request:
Host: www.cachelane.com
Content-Type (request)
We talked about Content-Type in the previous section. This is another example of headers that are used both in a Request and the Response.
This header is typically found in response headers. However, it can also be included in requests, such as POST requests, to provide additional information regarding the format of data being transmitted in the request body.
This header is particularly important because it allows the receiving end to correctly interpret and process the data. This can be especially critical in situations where the data being sent is complex or requires specific handling instructions, such as in the case of multimedia files or other specialized file formats.
Thus, while the "Content-Type" header may seem like a small and unimportant piece of information, it is actually a vital component of many requests and responses, helping to ensure that data is transmitted correctly and interpreted accurately.
Here's an example of how the Content-Type header may be used in the requests:
Content-Type: application/json
Response Headers
When a client sends a request to a server, it is the server's responsibility to send back a response with the appropriate headers. These headers contain information such as the type of content that is being sent, the status of the response, and any caching instructions that the client should follow.
For example, the Content-Type header, like we just discussed, indicates the format of the data being sent back to the client, such as HTML, JSON, or XML. The Cache-Control header specifies how long the client should cache the response before requesting it again from the server.
In addition to these standard headers, servers can also send custom headers that provide additional information specific to the application or service. For instance, an API might include a custom header containing a unique authentication token that the client can use to make subsequent requests. We'll use this technique while building our backend library, in the upcoming chapters.
Content-Type (response)
This header specifically deals with indicating the format or MIME type of the content being sent or received. It plays a pivotal role in ensuring that the client and server understand how to process the exchanged data accurately.
In response headers, the Content-Type header informs the client about the format of the content being sent by the server. For example, if a server is sending an HTML page as the response, it includes the Content-Type header to specify that the content is in HTML format:
→ HTTP/1.1 200 OK
→ Content-Type: text/html; charset=UTF-8
Here, the Content-Type header indicates that the content is HTML, and the charset attribute is an extra parameter which specifies the character encoding used. We talked about the extra parameters in the previous chapter (MIME Type and Content-Type)
Cache-Control
The Cache-Control header is a really important aspect of the HTTP protocol that web developers should not overlook. This header provides directives to both client and intermediary caches on how to handle the response from the server. It is highly recommended to use this header in every HTTP response because it plays a crucial role in optimizing performance and content freshness by controlling caching behavior.
Note
An intermediary cache, is a special server that sits between the client and the original server, serving as a middleman for requests and responses. The main job of an intermediary cache is to keep copies of often requested resources, like web pages, images, and other content, to decrease waiting time and network traffic.
There are two main types of intermediary caches:
- Proxy Cache: A proxy cache is like a middleman between employees' devices and the internet. When someone requests a web page, the proxy cache checks if it has a copy of that page and sends it straight to the person if it does. This saves time and internet data because the page doesn't have to be downloaded from the internet multiple times.
- CDN (Content Delivery Network): A CDN is a network of distributed intermediary caches placed in various locations around the world. One of the examples is AWS Cloudfront. CDNs are primarily used to deliver web content (like images, stylesheets, scripts) to end-users more efficiently. When a user requests content from a website using a CDN, the request is routed to the nearest CDN server. If the requested content is cached on that server, it's delivered quickly.
How Caches Work:
When someone requests a web page, the cache checks if it already has a copy of that web page. If it does, and the copy is still fresh (based on the expiration time and the Cache-Control header), the cache sends that copy to the person right away. This saves time and internet data. If the cache doesn't have a copy of the web page, it asks the origin server for the page. Once the origin server responds, the cache stores a copy of the page so it can send it to someone else who requests it in the future without asking the origin server again.
By specifying directives such as max-age and public, the server can communicate with the cache to determine how long the response should be cached and whether it can be cached by public caches or not. This way, the server can ensure that visitors get the latest version of the content, while avoiding unnecessary requests and thereby, improving the overall performance of the website.
Cache-Control Directives:
The Cache-Control header is used to provide directives to caching systems, instructing them on how to handle a response. It can specify whether a response should be cached, for how long, and whether it can be reused for subsequent requests. There are several common directives that can be used with this header.
public: Indicates that the response can be cached by both the client and intermediary caches. This is typically suitable for content that is meant to be shared publicly.private: Specifies that the response can be cached by the client but not by intermediary caches. This is useful for content that is specific to the individual user.max-age: Sets the maximum time (in seconds) for which the response can be cached. After this time elapses, the cached response becomes stale and should be revalidated with the server.no-cache: Instructs caches to revalidate the response with the server before using a cached copy, even if it appears to be fresh.no-store: Requires caches to not store the response at all. Each request/response cycle must involve contacting the origin server.
Let's see some of the examples on how we can use these directives with the Cache-Control header:
Always Cache (infrequent updates)
Suppose a website has static assets like images, stylesheets, and JavaScript files that rarely change. To improve performance, the server can allow public caching of these assets by specifying the Cache-Control header:
Content-Type: image/webp
Cache-Control: public, max-age=604800
If the max-age is set, and has the public directive, this means that the image is marked as publicly cacheable for up to 7 days (max-age=604800).
Always Cache (private only)
Consider a website that displays recommendations for each user based on their browsing history. These recommendations are relatively stable and can be cached on the user's device for a limited time to improve performance, and we do not wish the intermediate servers to cache this info. The private cache directive with the max-age directive can be used in this scenario.
Content-Type: application/json
Cache-Control: private, max-age=3600
The max-age=3600 directive specifies that the cached response can be used for up to 3600 seconds (1 hour). This means that the user's device will display the cached recommendations for subsequent interactions within the next hour.
Never Cache (realtime data)
For content that can change frequently, like social feed or your messages feed, the server might use the no-cache directive to ensure that clients revalidate the content on each request:
Content-Type: text/html
Cache-Control: no-cache, no-store, must-revalidate, max-age=0
When all these directives are combined as 'no-cache, no-store, must-revalidate, max-age=0', the goal is to prevent caching entirely and ensure that each request to the resource results in a revalidation with the origin server. This combination is useful for scenarios where content should always be dynamically generated and where no cached copy, regardless of freshness, is considered acceptable.
For example, if a web application displays real-time data, like stock prices or live news updates, this cache-control combination ensures that users always receive the most current information by fetching it directly from the origin server. It minimizes the risk of outdated data being displayed to users due to cached copies.
We looked at no-cache, no-store and max-age in the Cache-Control directives section. Let's take a look at the must-revalidate directive:
The must-revalidate directive emphasizes that the cached response must be revalidated with the origin server before being used, even if it's marked as fresh. If the cached response has expired, it must not be used without revalidation. It's an extra level of security to ensure up-to-date content.
Set-Cookie
The Set-Cookie header plays a key role in maintaining the state of a user's session. When a server sends a response to a client's browser, it can include instructions to store cookies, which are small pieces of data that are stored locally on the client's machine. These cookies can then be sent back to the server with subsequent requests, allowing the server to identify the client and maintain a record of their activity.
Cookies are widely used on the web for a variety of purposes, including tracking user sessions, personalizing user experiences, and more. For example, a website might use cookies to remember a user's login credentials so that they don't have to enter them every time they visit the site. Cookies can also be used to store user preferences, such as language, font size or theme (dark or light) for a more personalized browsing experience.
Note
We looked at the Cookie header earlier, which is sent as request header, on the contrary the Set-Cookie is sent as a response header.
Some of the most important components of the Set-Cookie header include expiration date (expires), the path attribute, the domain attribute, the secure attribute, and the HttpOnly attribute. These elements work together to ensure that cookies are delivered to the correct domain, are only accessible via secure connections, and cannot be accessed by malicious scripts or third-party applications.
expires: attribute allows you to specify the exact date and time when the cookie will expire. Once expired, the cookie will be considered invalid and will no longer be sent back by the client. By setting an expiration date, you can control how long the cookie will remain active on the user's computer.Note: If the
expiresattribute is not specified, the cookie becomes a session cookie. A session finishes when the client shuts down, after which the session cookie is removed. Many web browsers have a session restore feature that will save all tabs and restore them the next time the browser is used. Session cookies will also be restored, as if the browser was never closed.domain: This attribute allows you to specify the domain for which the cookie is valid. You can set it to a specific domain or a subdomain.path: This attribute allows you to specify the URL path for which the cookie is valid. The cookie will only be sent to the server if the requested path matches the specified path. This means that you can control which pages on your website can access the cookie.Let's say you set the
pathattribute as/blog:- If you type
/blog,/blog/,/blog/post, or/blog/post/1as the request path, it will work. - But if you type
/,/docs,/blogpost, or/v1/blogas the request path, it won't work.
- If you type
Secure: This attribute instructs the client to send the cookie only over secure (HTTPS) connections. This ensures that the cookie is transmitted securely and cannot be intercepted by attackers. By using this attribute, you can protect sensitive information stored in the cookie.HttpOnly: This attribute prevents client-side scripts from accessing the cookie through JavaScript. This enhances security by protecting sensitive information from being accessed by malicious scripts. By using this attribute, you can ensure that the cookie is only accessible through the server-side code. This mitigates attacks against cross-site scripting (XSS).
An example response using Set-Cookie:
Set-Cookie: userprefs=language=en; currency=INR; expires=Thu, 31 Dec 2023 23:59:59 GMT; Path=/; Secure; HttpOnly